
Getting started with Helmi through LUMI web interface
In this guide: Learn how to access the Helmi quantum computer through the LUMI web interface.
System requirements: Internet access and a code editor.
With the LUMI web interface, you can easily submit your quantum circuits to be executed on Helmi, currently the first quantum computer in Finland. Future upgrades will bring new machines with 20 and 50 qubits, providing even greater computational power. This hybrid environment allows researchers to accelerate their computations quickly and efficiently, whether running on a real QPU or simulating quantum circuits with GPU acceleration.
This guide will help you get started with using the Helmi quantum computer through the LUMI web interface. You’ll learn how to set up and submit quantum circuits to Helmi, whether using Jupyter Notebooks or terminal commands. Follow the step-by-step instructions to configure your environment, run your first quantum circuit, and manage your jobs within the LUMI system.
Before you begin
You must be assigned to a LUMI project before using any of its features. Follow these instructions to apply for and gain access to a LUMI project.
Using LUMI web interface
Once you have access to your LUMI project, you can begin submitting quantum circuits to the Helmi QPU. This guide covers two primary methods for job submission using the LUMI web interface:
-
Interactive Session using Jupyter Notebook: This method allows you to develop and test your quantum circuits interactively, providing a flexible and user-friendly environment for iterative experimentation.
-
Built-in Terminal on LUMI Web Interface: This method offers a command-line approach for submitting quantum circuits, suitable for users who prefer or require terminal-based interaction.
Additionally, you have the option to SSH into LUMI locally. By doing so, you can use the same commands as detailed in the terminal instructions section to submit jobs directly from your local environment.
Interactive access with Jupyter Notebook
Using an Jupyter Notebook, you can interactively develop and test your quantum circuits, making it easier to iterate and refine your experiments.
Create a Jupyter session by LUMI web interface
Login into LUMI web interface then click on Jupyter to open an interactive session

Fill in the required fields as shown in the picture below:
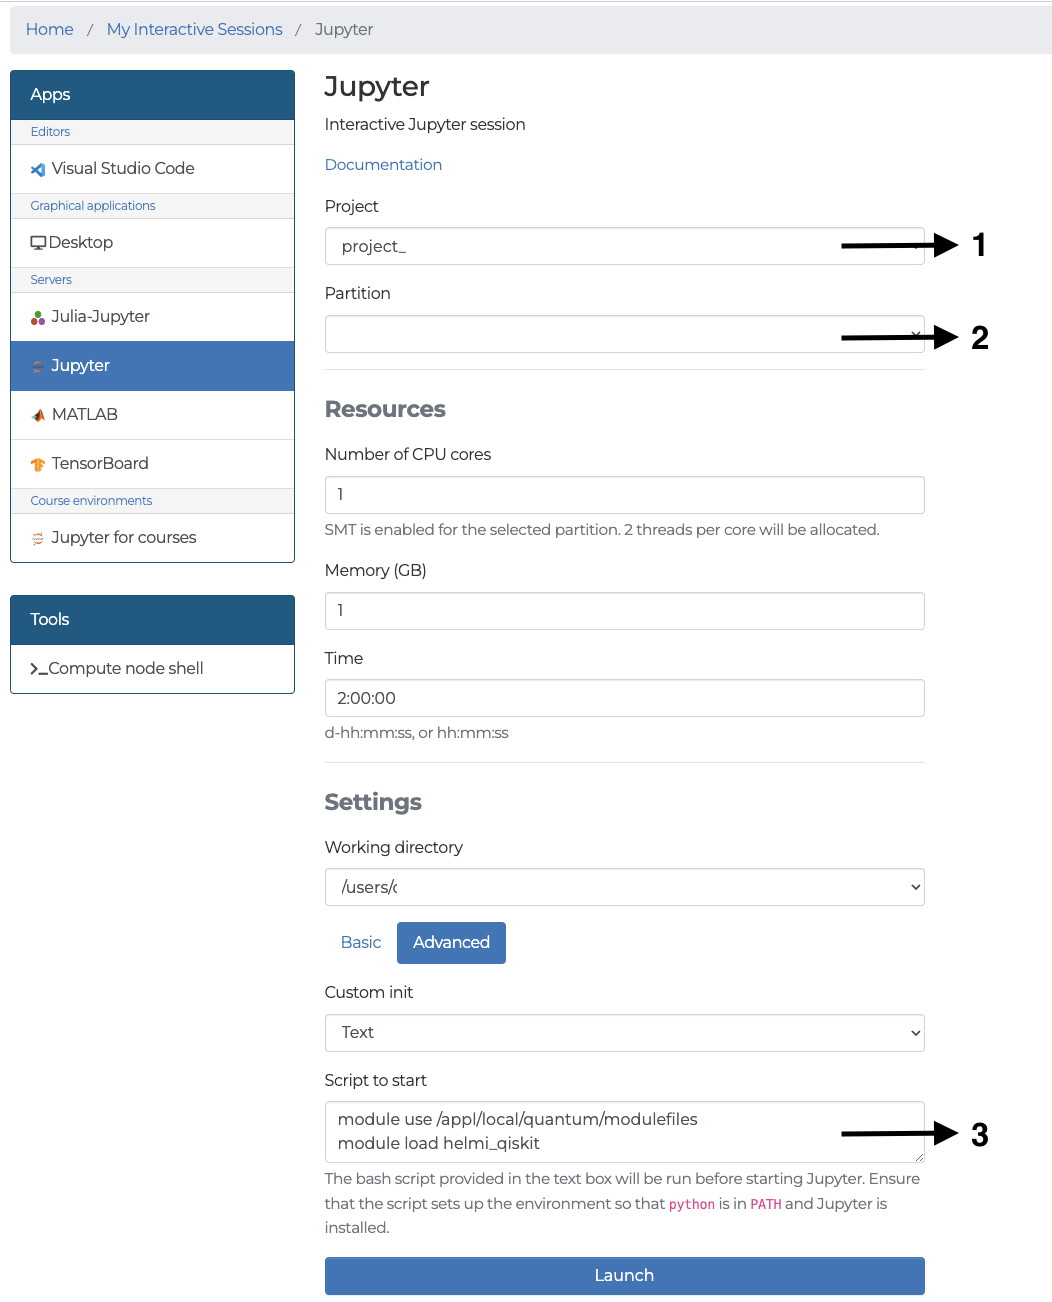
- Choose the project id that you have assigned for.
- Select the partition that connects to Helmi. Currently, only the
q_fiqcipartition is available for this purpose. - Add script to configure the quantum software stack environment:
module use /appl/local/quantum/modulefiles
module load helmi_qiskit
# or module load helmi_cirq
# if you want to use Cirq instead of Qiskit
Then click Launch to start the Jupyter session.
Example notebook code
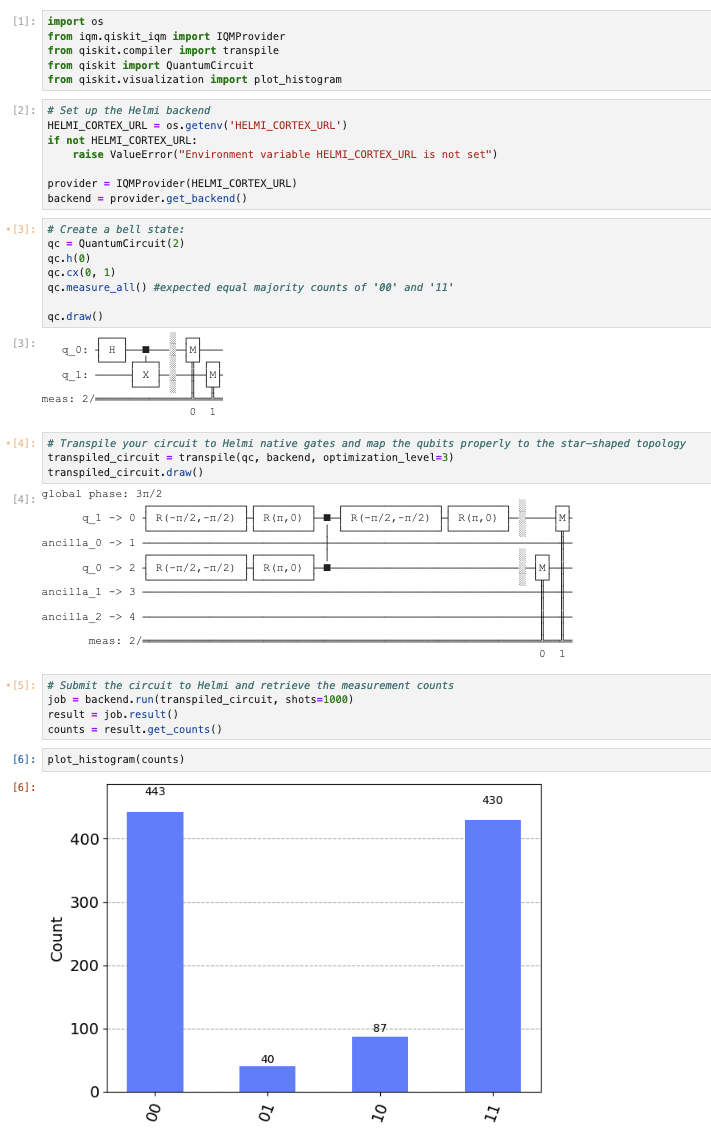
Once your Jupyter session is active, you can start writing and testing your quantum circuits directly within the notebook. Below is an example code (you can find it here) that you can run in your Jupyter Notebook to interact with the Helmi QPU.
Terminal access
Programming Quantum Circuit
Start by creating a Python file to set up your desired quantum circuit. To run your quantum circuit on Helmi, you need to connect to the Helmi backend using a specific URL (Helmi Cortex URL). This URL is pre-configured in the LUMI environment, so you just need to fetch it from the environment variables in your Python script. The example in example.py below demonstrates how to do this and set up your quantum circuit:
import os
from iqm.qiskit_iqm import IQMProvider
from qiskit.compiler import transpile
from qiskit import QuantumCircuit
from qiskit.visualization import plot_histogram


# Set up the Helmi backend
## The Helmi Cortex URL is pre-configured in the LUMI environment, so you only need to fetch it from the OS to gain access to Helmi.

HELMI_CORTEX_URL = os.getenv('HELMI_CORTEX_URL')
if not HELMI_CORTEX_URL:
    raise ValueError("Environment variable HELMI_CORTEX_URL is not set")

provider = IQMProvider(HELMI_CORTEX_URL)
backend = provider.get_backend()


# Create a bell state:
qc = QuantumCircuit(2)
qc.h(0)
qc.cx(0, 1)
qc.measure_all() #expected equal majority counts of '00' and '11'

print("My quantum circuit:")
print(qc.draw())


# Transpile the circuit to Helmi native gates, and map it to the star-shape topology backend
transpiled_circuit = transpile(qc, backend, optimization_level=3)

print("\nTranspiled quantum circuit:")
print(transpiled_circuit.draw())

# Execute the transpiled circuit on the backend
job = backend.run(transpiled_circuit, shots=1000)
result = job.result()
counts = result.get_counts()

print("\nCounts result:")
print(counts)

# You can also plot the histogram and save it into your lumi workspace
plot_histogram(counts).savefig("histogram.png")
Sbatch script to run on LUMI
To run your Python file on the LUMI system, you’ll need to create an sbatch script. This script is necessary for submitting your job to the LUMI job scheduler, which allocates resources and manages the execution of your job.
Create a script.sh file with the following content:
#!/bin/bash -l

#SBATCH --job-name=example # Job name
#SBATCH --output=./helmijob.o%j # Name of stdout output file followed by the job ID
#SBATCH --error=./helmijob.e%j # Name of stderr error file followed by the job ID
#SBATCH --partition=xxx # Partition (queue) name, replace xxx with correct partition
#SBATCH --ntasks=1 # One task (process)
#SBATCH --cpus-per-task=1 # Number of cores (threads)
#SBATCH --time=00:15:00 # Run time (hh:mm:ss)
#SBATCH --account=project_xxx # Project for billing, replace xxx with your own project_id
#SBATCH --mem-per-cpu=1G # Memory per CPU


module use /appl/local/quantum/modulefiles
module load helmi_qiskit # Load the module to use qiskit on Helmi

# module load helmi_cirq # Load the module to use cirq on Helmi

# Save the job ID to a file for later reference
echo $SLURM_JOB_ID >> job_id.txt

python example.py
If you want to install any additional python package to run your code, you can add pip install --user $package_name to script.sh.
Sending the script and check the status
- Login into LUMI web interface
- Go into your Home directory
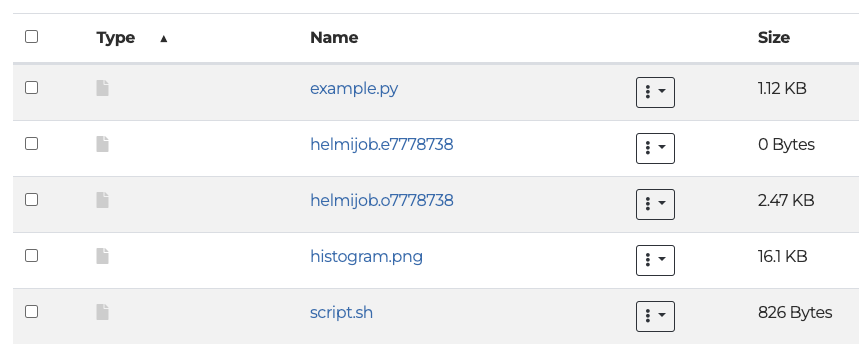
- Upload
example.pyandscript.shfiles - Click to open built-in terminal on the web interface.
- Send the job using the following command:
sbatch script.sh

Check the current status of the submitted job with:
squeue --me

If you type the command again and see no output, the job has already finished. You can see the output in the file helmijob.o$your_job_id and any errors in the file helmijob.e$your_job_id.
All the print() statements from the Python file will be written in the output file. When you click on the output file, you will see something like this:
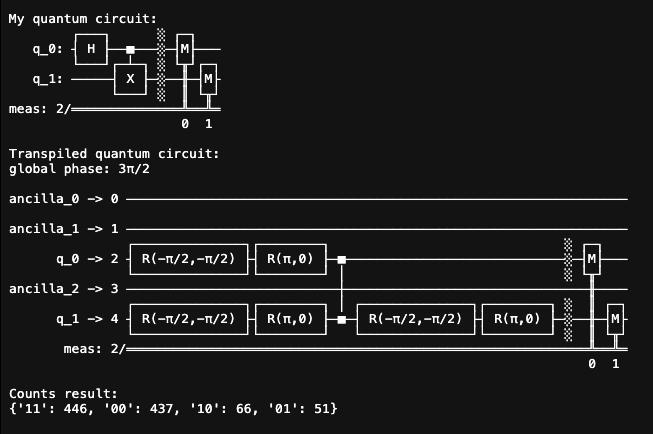
Even though we are expecting the counts result of ‘00’ and ‘11’, it also has a small portion of ‘10’ and ‘01’. This is because current QPU is noisy.
Now you have learned how to access to our hybrid environment of quantum computer. Congratulation!
Additional resources
- Terminal access: You can also ssh to lumi and send your circuits through your local terminal by ssh client
- Helmi technical details
- More examples running on Helmi
Give feedback
Feedback is greatly appreciated! You can send feedback directly to fiqci-feedback@postit.csc.fi.